Never let your sense of morals prevent you from doing what is right.

20,035 点击次数

作者: Centro Sun

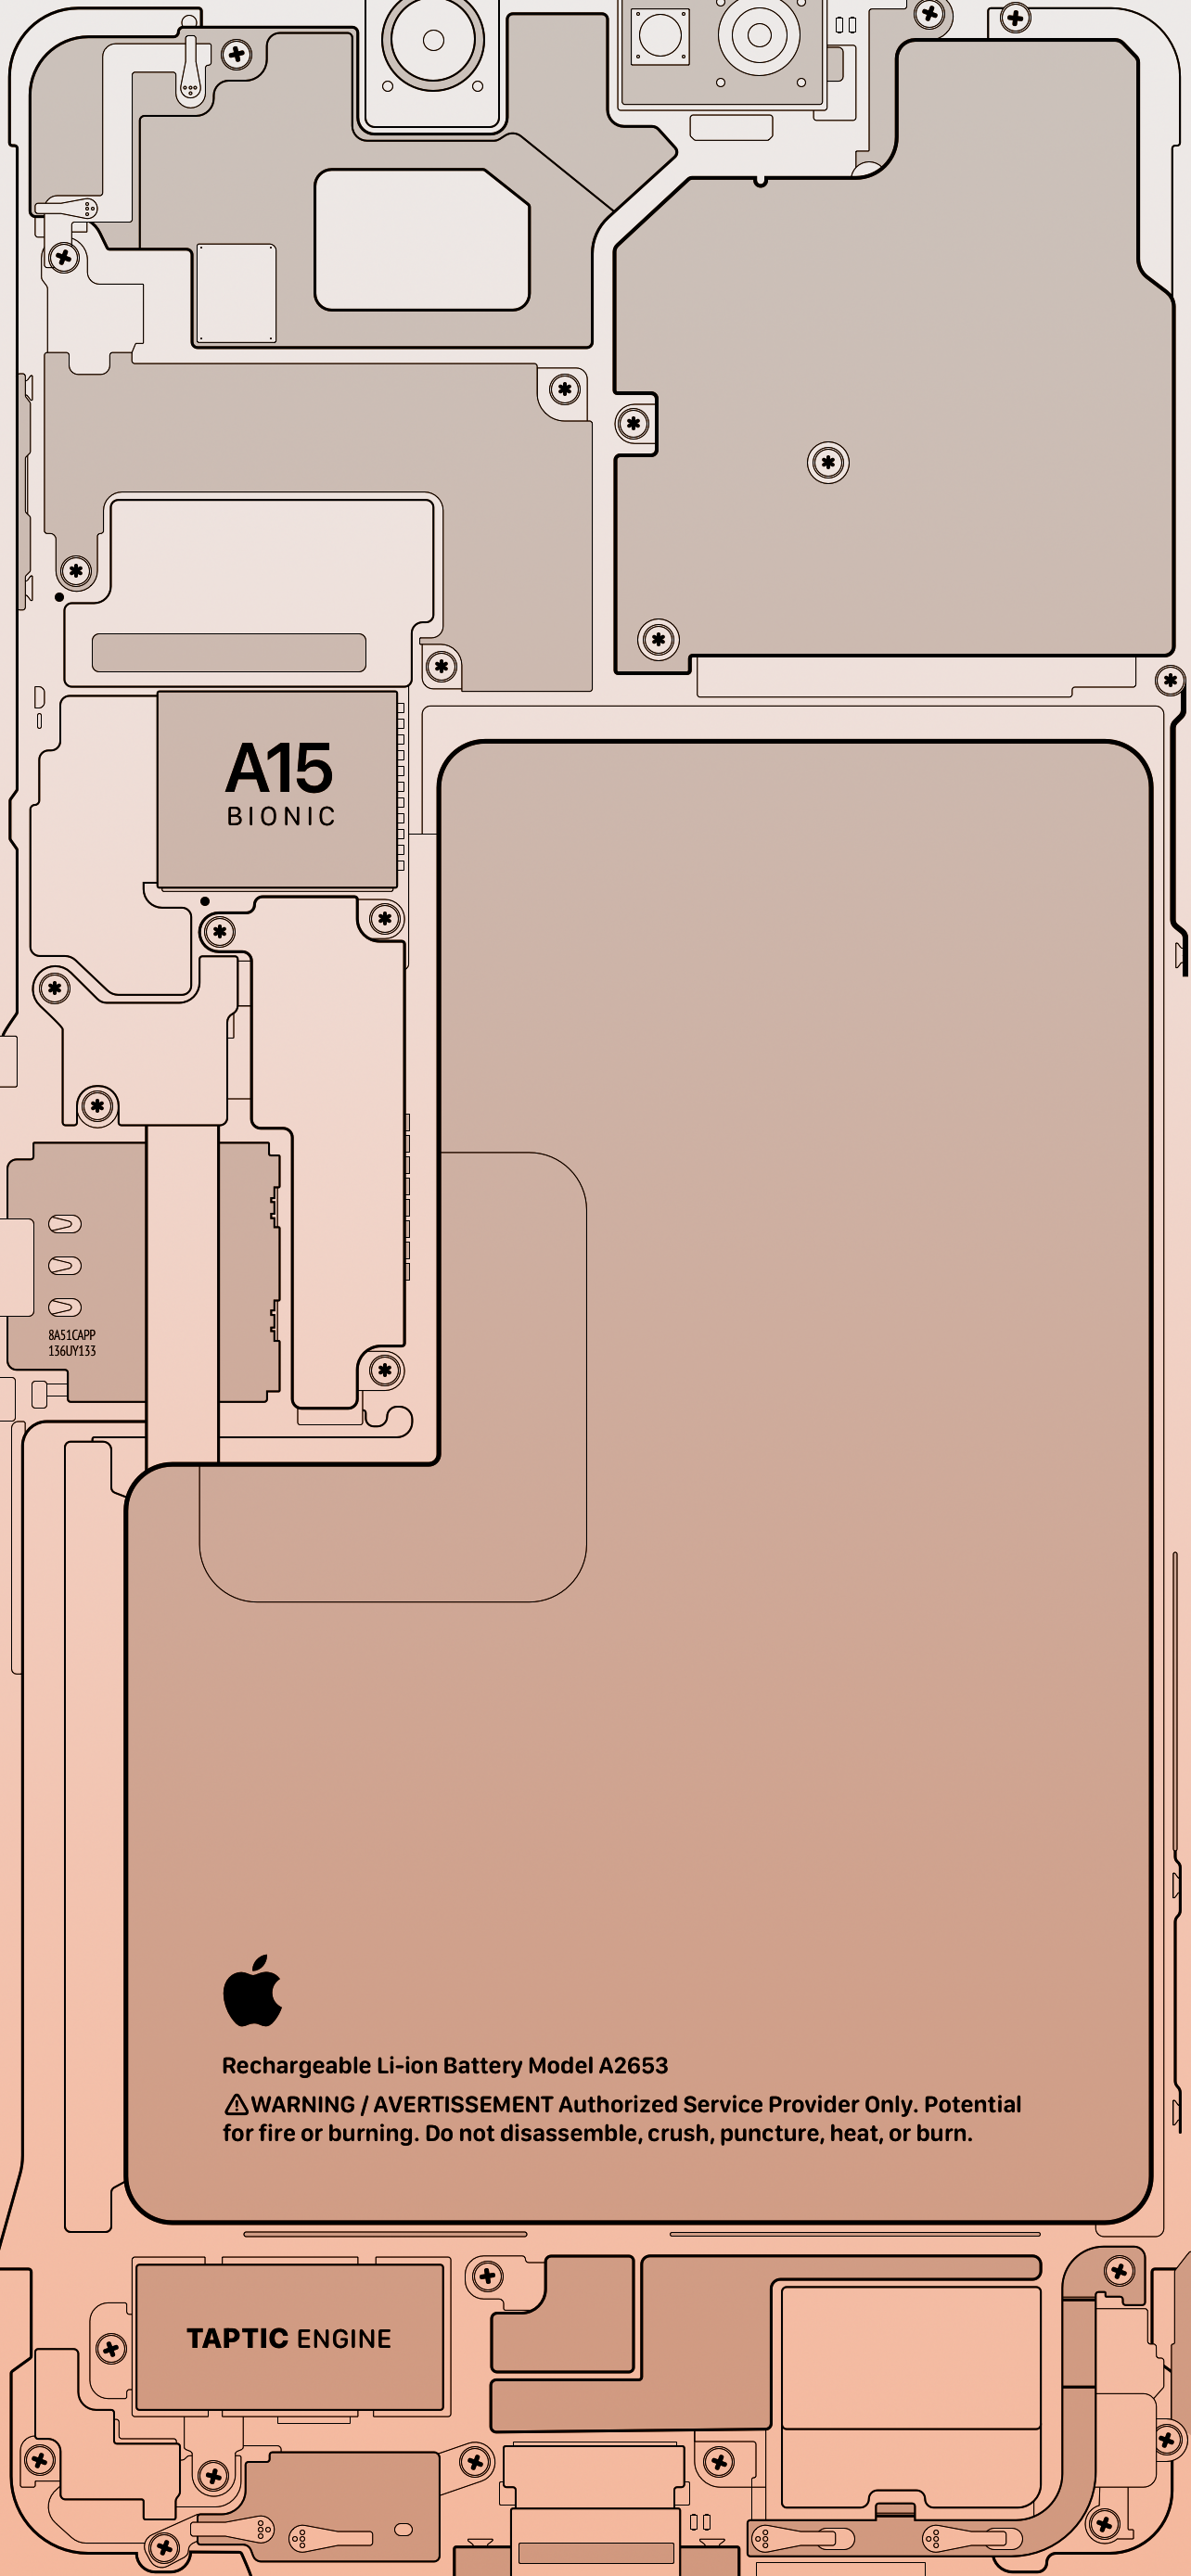
  • 适用于iPhone 13 Pro/13 Pro Max的高精度X光透视壁纸下载

    适用于iPhone 13 Pro/13 Pro Max的高精度X光透视壁纸下载

    今天逛cnBeta发现了一些精美的手机壁纸,搁在自己的博客里作为备份。

    适用于iPhone 13 Pro及Pro Max

    原文链接:https://www.cnbeta.com/articles/tech/1217007.htm

    这些所谓的原理图壁纸是根据 iFixit 公司的人提供的拆解 X 射线图片制作的。在一篇博文中,The Basic Apple Guy 解释了用 Sketch 和 Pixelmator 创建这些壁纸的繁琐过程。博文中写道

    iPhone 13 Pro 和 13 Pro Max 的原理图是在 Sketch 中非常、非常乏味地创建的,使用 iFixit 壁纸作为指导,精确到每个部件的位置。一根根晶体管,一颗颗螺丝,这些壁纸在许多小时内慢慢变成了现实。

    然后,项目被导入 Pixelmator,为你的设备创造各种令人惊叹的变化。而一旦 iPhone 13 Pro 壁纸完成后,第二个 13 Pro Max 项目也从头开始创建。虽然它们共享许多相同的组件,但组件的尺寸和位置需要对项目进行全面重建。

    XRayProMax
    XRayProMax
    XRayPro
    XRayPro
    SunsetProMax
    SunsetProMax
    SunsetPro
    SunsetPro
    SlateProMax
    SlateProMax
    SlatePro
    SlatePro
    Rainbow+Bloom+13Pro
    Rainbow+Bloom+13Pro
    Rainbow+Bloom+13+Pro+Max
    Rainbow+Bloom+13+Pro+Max
    Rainbow+13+Pro+Schematic
    Rainbow+13+Pro+Schematic
    Rainbow+13+Pro+Max+Schematic
    Rainbow+13+Pro+Max+Schematic
    M1ProMax
    M1ProMax
    M1Pro
    M1Pro
    BluePrintProMax
    BluePrintProMax
    BluePrintPro
    BluePrintPro
    BlueNeonProMax
    BlueNeonProMax
    BlueNeonPrintPro
    BlueNeonPrintPro
    BlackProMax
    BlackProMax
    BlackPro
    BlackPro
    AppleCardProMax
    AppleCardProMax
    AppleCardPro
    AppleCardPro
  • 部署HPC集群的实施方案

    部署HPC集群的实施方案

    最近在研究HPC,找到一篇很有价值的文章,做个备份。

    部署HPC集群的实施方案

    零、前言

    本教程(实际上是一个集群部署的操作流程)旨在通过一个小型的HPC集群部署过程讲述基于Beowulf架构的HPC集群原理、主流工具等相关内容,并不对各个工具的特性及其使用方法进行深入的研究分析。
    一、系统配置

    1.1 网络拓扑

    服务器内网IP计算专网IP域名备注
    登陆节点172.17.22.16loginserver-chaosuan
    管理节点172.17.22.13
    计算节点1172.17.29.11192.168.1.11compute11主节点
    计算节点2172.17.29.12192.168.1.12compute12
    计算节点3172.17.29.13192.168.1.13compute13
    计算节点4172.17.29.14192.168.1.14compute14

    1.2 操作系统

    登录节点:CentOS Linux release 7.3.1611

    管理节点:CentOS Linux release 7.3.1611

    计算节点:CentOS Linux release 7.9.2009,
    二、计算节点、登录节点配置

    2.1 域名设置

    在登录节点、所有计算节点上执行以下命令,完成节点域名配置

    vi /etc/hostname
    vi /etc/hosts

    2.2 免密登录

    以loginserver-chaosuan为例,在登录节点、所有计算节点上执行以下命令,设置免密登录

    a) 生成公钥私钥

    ssh-keygen -t rsa

    b) 拷贝公钥到其他节点

    ssh-copy-id compute11
    ssh-copy-id compute12
    ssh-copy-id compute13
    ssh-copy-id compute14

    2.3 关闭防火墙

    在登录节点、计算节点执行以下操作,

    a) 查看防火墙状态

    systemctl status firewalld.service

    b) 关闭运行的防火墙

    systemctl stop firewalld.service

    c) 开机关闭防火墙

    systemctl disable firewalld.service

    d) 修改selinux

    vi /etc/selinux/config

    将SELINUX=enforcing改为:SELINUX=disabled,并执行setenforce 0使他立即生效,当然你也可以重启机器
    三、NTP服务

    使用compute11作为NTP服务器,loginserver-chaosuan 、compute12、compute13、compute14等作为NTP客户端。

    3.1 NTP服务器

    a) 安装NTP

    yum install -y ntp

    b) 修改ntp的配置文件

    vi /etc/ntp.conf
    #ntp.conf中有默认的时间服务器,我们需要注销,然后添加上我们对应的时区时间服务器
    server ntp1.aliyun.com
    server ntp2.aliyun.com
    server ntp3.aliyun.com
    
    #兜底时间服务器,当以上三个时间服务器不可用时,就是以本机时间作为集群机器的统一时间。
    server 127.0.0.1
    fudge 127.0.0.1 stratum 10

    c) 主机做时间同步

    ntpdate -u ntp2.aliyun.com

    d) 开机启动

    systemctl enable ntpd

    e) 重启NTP

    systemctl start ntpd
    systemctl status ntpd

    f) 检查NTP

    ntpstat

    3.2 NTP客户端

    a) 安装NTP

    yum install -y ntp

    b) 修改ntp的配置文件

    vi /etc/ntp.conf
    
    server 172.17.29.11

    c) 开机启动

    systemctl enable ntpd

    d) 重启NTP

    systemctl start ntpd
    systemctl status ntpd

    e) 检查NTP

    ntpstat

    四、建立NFS服务

    虽然在HPC场景下NFS性能被人所诟病,但是其部署比较简单,还是以NFS为例来说明。对性能有一定要求的场景,可以考虑GPFS、Lustre等并行文件系统。

    使用compute11作为NFS服务器,loginserver-chaosuan 、compute12、compute13、compute14等作为NFS客户端。

    4.1 NFS服务器

    a) 安装RPC和NFS软件包

    yum -y install rpcbind nfs-utils

    b) 启动服务和设置开启启动

    systemctl start rpcbind    #先启动rpc服务
    systemctl enable rpcbind   #设置开机启动
    systemctl start nfs-server nfs-secure-server #启动nfs服务和nfs安全传输服务
    systemctl enable nfs-server nfs-secure-server
    firewall-cmd --permanent --add-service=nfs #配置防火墙放行nfs服务
    firewall-cmd  --reload

    c) 配置共享文件目录,编辑配置文件

    chmod go+w /home #开通自己组group和其他人other的写权限
    vi /etc/exports
     /home 172.17.22.16(rw,async,no_root_squash)
     /home 192.168.1.0/24(rw,async,no_root_squash)
    systemctl reload nfs #重新加载NFS服务,使配置文件生效

    4.2 NFS客户端(计算节点)

    a) 安装RPC和NFS软件包

    yum -y install rpcbind nfs-utils

    b) 查看服务器抛出的共享目录信息

    showmount -e 192.168.1.11

    c) 在客户端创建目录,并挂载共享目录

    vi /etc/fstab #在该文件中挂载,使系统每次启动时都能自动挂载

    192.168.1.11:/home /home nfs defaults 0 0
    mount -a #是文件/etc/fstab生效

    d) 检查

    df -Th

    4.3 NFS客户端(登录节点)

    a) 安装RPC和NFS软件包

    yum -y install rpcbind nfs-utils

    b) 查看服务器抛出的共享目录信息

    showmount -e 172.17.29.11

    c) 在客户端创建目录,并挂载共享目录

    vim /etc/fstab #在该文件中挂载,使系统每次启动时都能自动挂载

    172.17.29.11:/home /home nfs defaults 0 0
    mount -a #是文件/etc/fstab生效

    d) 检查

    df -Th

    五、建立NIS服务

    使用compute11作为NFS服务器,loginserver-chaosuan 、compute12、compute13、compute14等作为NFS客户端。

    5.1 NIS服务器

    a) 安装软件包

    yum install yp-tools ypbind

    b) 设置开机域名

    vi /etc/sysconfig/network
    NISDOMAIN=hpc

    c) 指定NIS查询的主机名称

    vi /etc/yp.conf
    ypserver compute11

    d) 启动NIS

    systemctl enable ypbind.service
    systemctl restart ypbind.service
    systemctl status ypbind.service

    e) 验证

    ypwhich #查看NIS服务器名称
    ypcat passwd #查看NIS服务端设置的账号

    f) 使用NIS数据库设置服务搜索顺序

    vi /etc/nsswitch.conf,将相关行改成以下值

    passwd:files nis
    shadow:files nis
    group:files nis
    hosts:files nis dns

    g) 重启NIS

    systemctl restart ypbind.service

    h) 添加账户

    useradd hycom
    useradd lsfadmin
    cd /var/yp
    make

    5.2 NIS客户端(计算节点)

    a) 安装软件包

    yum install yp-tools ypbind

    b) 设置开机域名

    vi /etc/sysconfig/network
    NISDOMAIN=hpc

    c) 指定NIS查询的主机名称

    vi /etc/yp.conf
    ypserver compute11

    d) 启动NIS

    systemctl enable ypbind.service
    systemctl restart ypbind.service
    systemctl status ypbind.service

    e) 验证

    ypwhich
    ypcat passwd

    f) 使用NIS数据库设置服务搜索顺序

    vi /etc/nsswitch.conf,将相关行改成以下值

    passwd:files nis
    shadow:files nis
    group:files nis
    hosts:files nis dns

    g) 重启NIS

    systemctl restart ypbind.service

    5.3 NIS客户端(登录节点)

    操作过程同上。

    六、编译器配置

    6.1 安装编译器

    安装Intel Parallel Studio XE 2019 Cluster Edition编译器,解压之后直接运行./install.sh即可。

    6.2 配置环境变量

    在登录节点、所有计算节点上修改~/.bash_profile文件,

    vi ~/.bash_profile

    6.3 编写节点列表文件

    6.4 运行Intel MPI测试程序

    mpirun -np 20 -f /home/hycom/machinefile ./hello-mpi

    七、TORQUE

    在管理节点上,通常需要安装LSF、TORQUE、SLURM等作业调度系统。虽然IBM提供了开源版本的LSF,但是对集群规模有一定的限制,建议预算有限的场景采用TORQUE、SLURM等。本文使用TORQUE进行讲解。

    7.1 TORQUE服务器

    使用节点loginserver-chaosuan.novalocal作为Torque服务器:

    a) 安装依赖包

    yum -y install libxml2-devel openssl-devel gcc gcc-c++ boost-devel libtool

    b) 编译安装torque

    tar -zxvf ./torque-4.1.2.tar.gz
    cd ./torque-4.1.2
    ./configure --prefix=/opt/torque
    make
    make packages
    make install #卸载的话是make uninstall 

    c) 开机启动

    cp contrib/init.d/{pbs_{server,sched,mom},trqauthd} /etc/init.d
    for i in pbs_server pbs_mom trqauthd; do chkconfig --add $i; chkconfig $i on; done
    
    d) 设置环境变量
    
    vi /etc/profile
      TORQUE=/opt/torque
      export PATH=$PATH:$TORQUE/bin:$TORQUE/sbin

    d) 设置环境变量

    vi /etc/profile
    TORQUE=/opt/torque
    export PATH=$PATH:$TORQUE/bin:$TORQUE/sbin

    e) 将root设置为管理账户

    ./torque.setup root

    f) 启动服务

    qterm -tquick
    for i in pbs_server pbs_sched pbs_mom trqauthd; do service $i start; done

    g) 调度节点配置计算节点的主机名和CPU核数

    vi /var/spool/torque/server_priv/nodes
    compute11 np=28
    compute12 np=28
    compute13 np=28
    compute14 np=28

    h) 重启服务

    for i in pbs_server pbs_sched pbs_mom trqauthd; do service $i restart; done

    7.2 torque客户端(计算节点)

    使用compute11、compute12、compute13、compute14等作为torque客户端,以compute11为例,配置方法如下:

    a) 将loginserver-chaosuan.novalocal上的安装包拷贝到compute11

    scp contrib/init.d/{pbs_mom,trqauthd} root@compute11:/etc/init.d/
    scp torque-package-{mom,clients}-linux-x86_64.sh root@compute11:/root/

    a) .安装软件包

    ./torque-package-clients-linux-x86_64.sh --install
    ./torque-package-mom-linux-x86_64.sh --install

    b) 配置环境

    vi /var/spool/torque/mom_priv/config
    pbsserver loginserver-chaosuan.novalocal
    logevent 225

    c) 启动pbs_mom

    for i in pbs_mom trqauthd; do service $i start; done

    d) 配置环境变量

    vi /etc/profile
      TORQUE=/opt/torque
      export PATH=$PATH:$TORQUE/bin:$TORQUE/sbin

    e) 查看节点是否正常

    qnodes #或者是pbsnodes -a

    八、存储服务器

    实际情况通常需要根据需要配置单独的存储服务器。由于这部分涉及到具体的存储系统,请视情况自行处理。

    九、集群监控

    Ganglia是一个跨平台可扩展的,高 性能计算系统下的分布式监控系统,主要是用来监控系统性能,如:cpu 、mem、硬盘利用率,I/O负载、网络流量情况等,通过曲线很容易见到每个节点的工作状态,对合理调整、分配系统资源,提高系统整体性能起到重要作用。网上已经有不少安装教程,不再赘述。

    参考资料

    [1]. Linux高性能计算集群 — Beowulf集群
    ————————————————
    版权声明:本文为CSDN博主「JiNan.YouQuan.Soft」的原创文章,遵循CC 4.0 BY-SA版权协议,转载请附上原文出处链接及本声明。
    原文链接:https://blog.csdn.net/qq_26221775/article/details/111708789

  • 如何初始优化一台全新的电脑——软件篇

    之前写了新购电脑的各种初始化、优化的小技巧,接下来我们看看如何选择高效易用的软件,如何擦亮眼睛分辨李鬼、恶鬼,让自己的电脑保持流畅的运行。

    验机测分

    本来不想写这部分的,因为只要你是从正规渠道购买的全新的笔记本或电脑、能够提供正规的发票的,那实际上基本不需要进行验机的。不过既然有网友问过我这个问题,那我就来阐述一下我个人的观点吧。如果不能说服您,也还是给您提供了推荐的软件,毕竟检查一下自己的电脑也无可厚非嘛。

    首先,无论是台式机还是笔记本,经过了这么多年的发展,制造工厂、供应链都已非常完善、成熟了。只要你不剑走偏锋、贪低价,所买到的全新(二手的骗术太多,如果大家关注的话我后面也可以写一篇)电脑,是几乎不存在偷换硬件的情况的。

    再来说一下品牌的选择,联想虽然在国内口碑不佳,黑粉特别多,但不可否认,收购IBM这么多年了,成熟的东西都吸收差不多了,再差,掉出过第一梯队吗?至于什么是不是中国企业的,你管那么多干啥?所以我的第一推荐是联想;其他的一些一线品牌戴尔、惠普、华硕,也都可以;再差一点的,宏基、技嘉也没问题;有钱且适应能力(能迅速接受并掌握那些颠覆传统、打破常规的新知识的能力)强的,选苹果、微软的准没错。

    不推荐的品牌:华为、小米。身边好多人用的都翻车了,翻得一手好车,产品吹的再好,也不要买。为啥?这么说吧,他们做笔记本才几年?

    说的差不多了,咱们回归正题,选择什么软件来验机、评分呢?

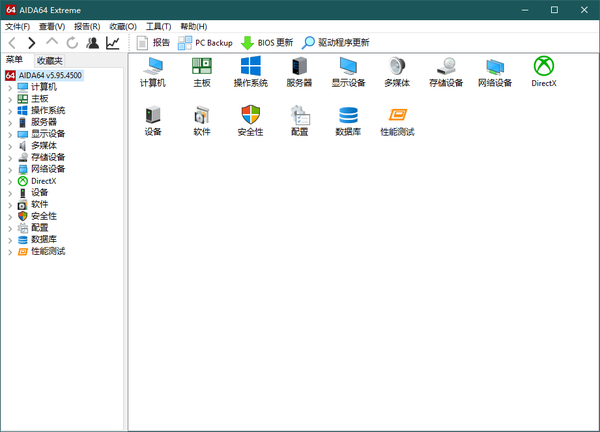
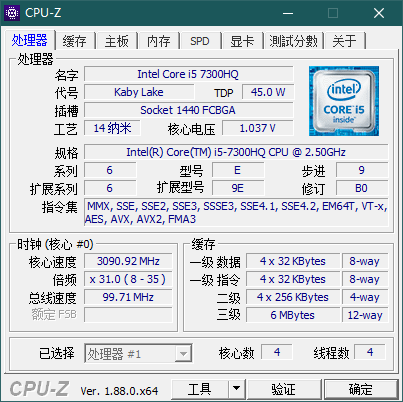
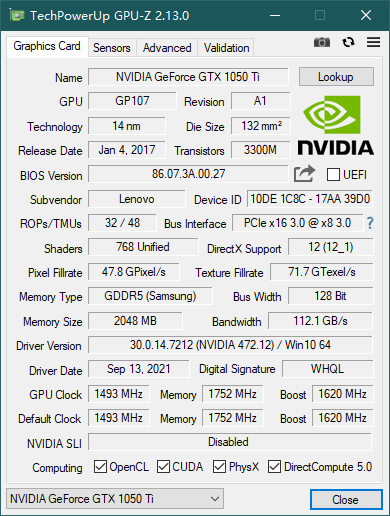
    AIDA64、CPU-Z、GPU-Z,其他的什么鲁大师、腾讯管家、360管家啥的,千万不要装。看起来很美好:验一下你的电脑评分是多少、还能优化系统还能清理垃圾、保护你的系统安全、防病毒木马等等。一套套小词儿整的,你回想一下集市上那些吆喝现场演示卖菜刀的,有几个人买的?大部分不都在看热闹吗?一个套路,咱们中国人就吃这一套,买回去你就上当。

    为了避免大家在百度搜索时中了全家桶的招,这里照例贴出官网,直接去官网下载就好了。
    AIDA64,收费,整机的每一个硬件都能进行查证,高级版还可以进行测分:

    https://www.aida64.com/

    CPU-Z,免费,仅限于CPU、主板、内存、显卡部分参数、CPU测分:

    https://www.cpuid.com/softwares/cpu-z.html

    GPU-Z,免费,仅限于显卡,可以实时监控显卡的指标变化,例如温度、主频等等:

    https://www.techpowerup.com/download/techpowerup-gpu-z/

    优化软件

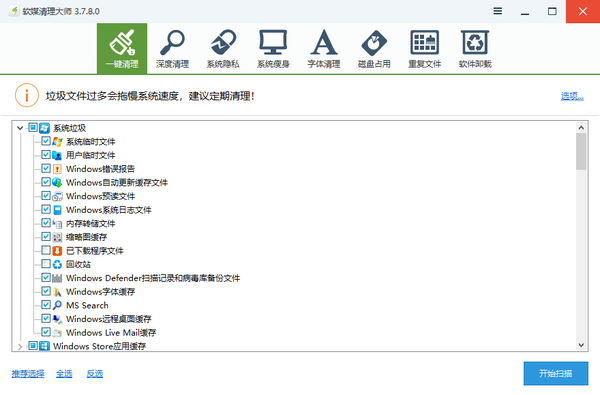
    优化软件适合小白用的且没有坑的,真的太少了,以前有个PCMaster(软媒魔方)还算可以,但是它需要创建一个服务进程开机启动,除此以外还算良心。以前Windows 7时代更新频繁,现在版本更新慢了,在Windows 10下也能用,建议下载绿色版使用。我喜欢用它的原因是习惯了曾经的Windows优化大师的风格,主要用它清理系统垃圾、去除快捷方式图标左下角角标。

    放出官网链接,免费:

    https://mofang.ruanmei.com/

    其他的就不要考虑了,比如上面章节提到的鲁大师、腾讯管家、XX管家、360等等。

    图像处理

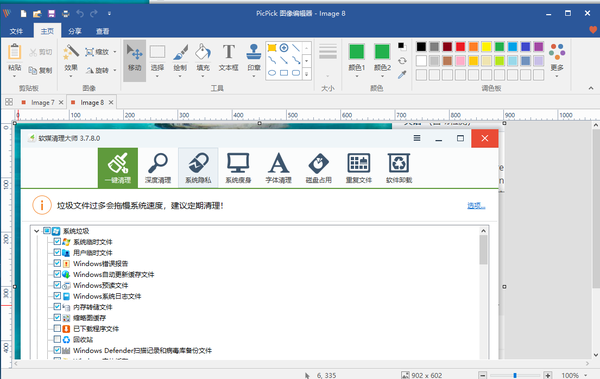
    关于图像处理这块,我想说的不是ACDSee、PhotoShop,而是截图工具。给大家推荐PickPic,当然Faststone也不错,很老牌的厂商了,功能都差不多。没办法,我习惯了PickPic,日常的截图功能足够用了。

    虽然说免费版有广告,但我使用过程中真没怎么遇到过,官网链接:

    https://www.picpick.org/

    桌面美化

    从使用Windows XP开始爱上了美化桌面,用过不少这类软件,目前唯一留在我现在系统里的,只有一款,就是业界知名的小雨滴——Rainmeter:

    https://www.rainmeter.net/

    英文的?别怕,还有咱们中文的社区,里面有很多的资源可供下载:https://www.rainmeter.cn/​

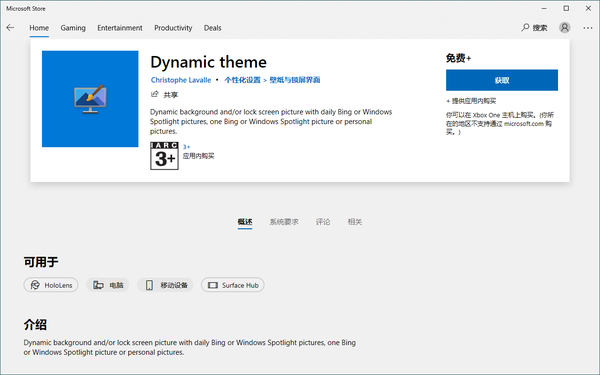
    这些都是依靠Rainmeter做到的,各种各样的系统指标,都可以用优美的图标表现出来,中文社区有大量的资源包供下载。有的同学可能心想这些指标我不想持续关注,电脑能用就行了,整那么多花里胡哨复杂的干啥?没关系,还有另外一个简单的选择,每天更换一张壁纸——Dynamic theme:

    这个是微软应用商店里的软件,需要依次打开开始菜单 – Microsoft Store,然后搜索该软件名称才能找到:

    该软件可以每天从Bing网站上抓取一张壁纸,自动更换,不仅能够更换桌面壁纸,锁屏壁纸也可以更换哦。试试吧,每天都换一个心情,提高工作效率。

    解压缩

    最近发现关于解压缩这个领域,似乎出现了几个看起来比较优秀的国产软件,例如Bandzip,还有之前全家桶常见的“好压”啥的。据说Bandzip挺好用,说实话,本人没有下载使用过,所以就不推荐了,但是根据以往的经验,不会好到哪里去。还是推荐我常用的吧,7-Zip,一款开源的解压缩软件,与WinRAR配合使用足矣。虽然界面简陋了点,但够用就好啊,简洁明了。

    http://www.7-zip.org​

    浏览器

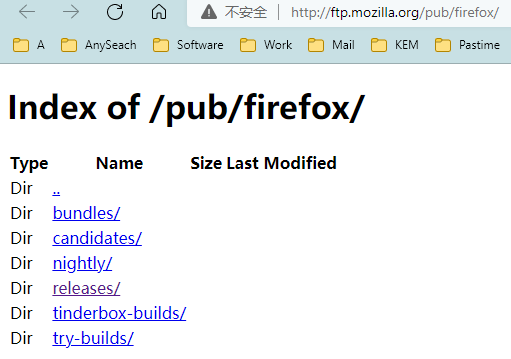
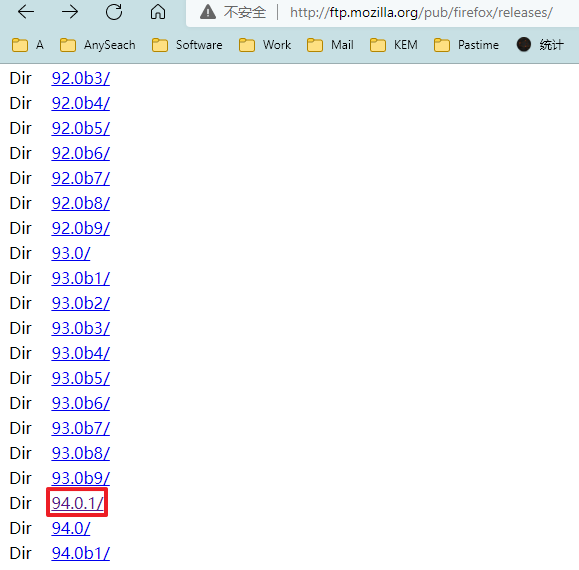
    职业习惯,浏览器只选头部厂商的,Firefox、Chrome、Edge,如果觉得前两个不好用,那就用Windows 10内置的Edge就足够了,可以安装插件,还是Chromium内核,日常办公完全没问题。需要解释的是如果选择使用Firefox,千万别去中文官网下载,安装包里会加入一些推广插件,我给出官网靠谱的链接: /pub/firefox/​ftp.mozilla.org

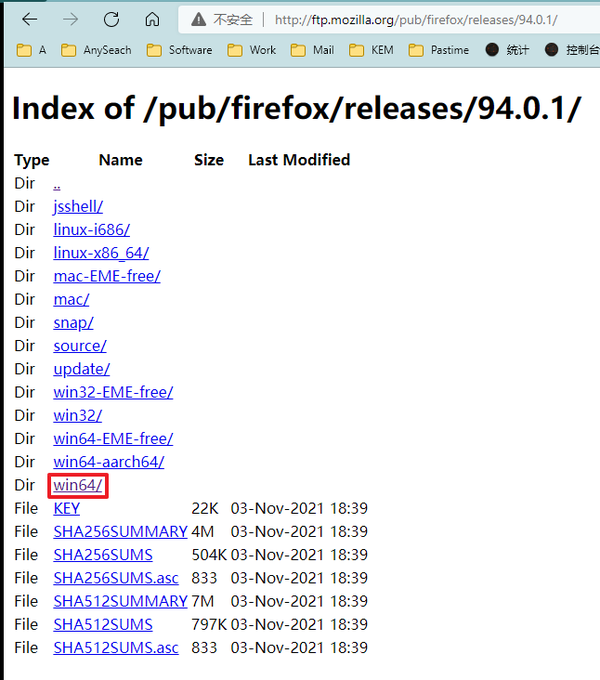
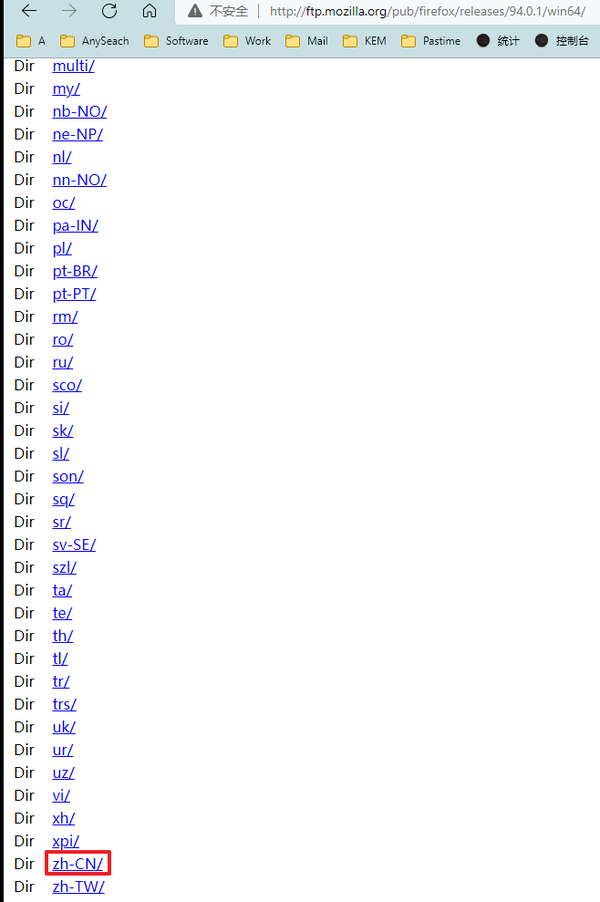
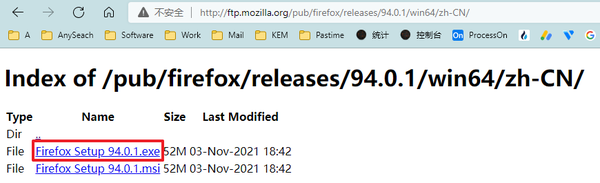
    靠谱是靠谱,下载起来有点费劲,需要点进releases目录去找到最新的版本号进行下载,现在时间是2021年11月15日,最新版是94.0.1,所以最终的路径是:

    选择最新的版本号,可以等页面载入完成后按Ctrl+F5搜索 94.0.1
    选择适用于Windows 10的版本,win64
    选择中文语言的安装包,zh-CN
    最后总算可以下载了,下载exe后缀的即可

    这里给出94.0.1的下载链接,省的一点一点找了,如果您在未来看到了这片文章,可以把网址中的94.0.1改为当前最新的版本号,也可以:/pub/firefox/releases/94.0.1/win64/zh-CN/

    翻译软件

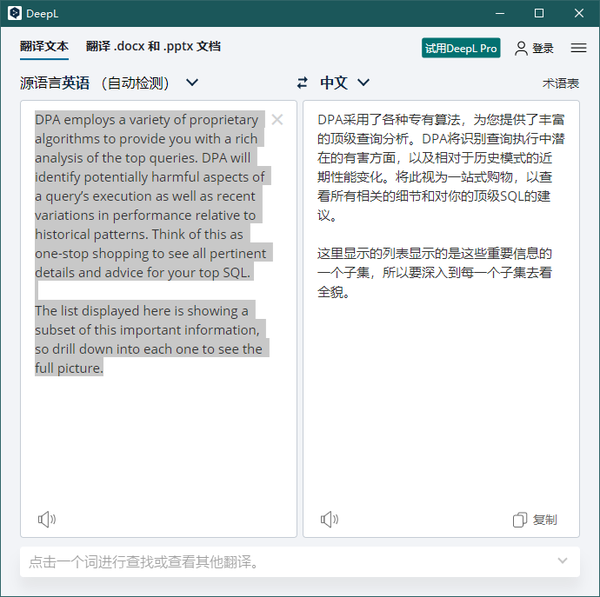
    翻译软件这里推荐使用DeepL,而不是大家常见的有道翻译、金山翻译啥的。理由:号称基于人工智能的翻译结果,最适合整句整段的翻译,有收费版本,但是不在中国地区销售,无所谓,免费版已经足够用了。来对比一下翻译效果,下面是DeepL:

    https://www.deepl.com/zh/app/

    下面是有道词典:

    重点来感受一下最后一句话的翻译,是不是能更易读一些?当然有道词典还是有存在必要的,毕竟有大量的辞典,有时候纠某一个生僻词汇的时候,可以多翻一翻辞典来选择哪个翻译才是最准确的。

    总结

    先写这么多吧,大家如果需要新增其他方面的推荐,我会继续完善。

  • 如何初始优化一台全新的电脑——操作系统篇

    题记

    写这篇文章是因为前段时间知乎给我推了很多的电脑相关的文章,看完之后五味杂陈,没啥干货,却又夹杂私货。

    一赌气,还是决定自己亲自来写一篇吧。

    正文

    标题没有跟风加入一些吸睛文字,这其实就表明了本文的主旨,干货满满。另外,非常欢迎大家来交流,如果有好的问题启发我,我会继续完善下去。

    本文面向的读者群主要是电脑小白,当然如果您是资深专家、大神,也非常欢迎前来讨论。

    其实,要想把电脑用好,不一定非要特别专业的基础知识,小白照样也能飞起。关键就在于新电脑到手之后请安耐住激动的心情,先把该设置的都设置了,毕竟它要陪伴你好多年。像我的电脑,最高纪录是用了七年,联想Y460, 系统自己换成了Windows 7 旗舰版(Home版实在是用不惯)内存自己升到了8GB,并加了一块M.2的海盗船64GB SSD,那会SSD还很贵,我记得好像花了800多。

    受限于国内大环境,大家总会感觉网速慢、电脑慢、游戏卡等等,其实这些都是环境使然,国内的IT市场其实一直是劣币驱逐良币的局面,近几年算好一些了,毕竟咱们国家的工信部也是下了大力度进行整治的。但是,还不够好,总有一些“绝顶聪明”的人会去钻空子。好了,不扯太远,我们回到正题。

    这一篇里讲操作系统,如何对操作系统进行投入使用前的优化。

    操作系统是人机交互的中间媒介,其设置至关重要,因为它决定了以后你的电脑是否能够乖乖听话。

    我本人使用Windows XP大概有7年时间,Windows 7大概8年,Windows 10大概5年,其他诸如OpenBSD、NetBSD、FreeBSD、Solaris、Slax、Gentoo、Mandriava、SuSE、RedHat、CentOS、Debian、Ubuntu,Windows 98、2000、2003、Vista、2008、2008 R2、2012、2016、2019就不说了,毕竟不是日常使用。

    秀的差不多了,继续。

    现在的主流是Windows 10,所以这里就以Windows 10操作系统为基础展开来说。Windows 11虽然已经发布多日,但仍在襁褓之中,不要升级、不要升级、不要升级,三遍Over,还有很多地方亟待完善,不适合作为主力机、生产机。

    当你刚拿到一台全新的电脑(甭管是笔记本还是台式机,如无特别说明,以下所说均适用),或者刚刚装好操作系统,那我们就可以开始优化之旅了。

    先来一张图镇楼

    硬盘分区

    这里主要是面向那些新购电脑的朋友,毕竟如果自己安装系统的话,那在安装之前就可以进行分区了。新购电脑的分区往往很应付了事,C盘特别大,其实完全没必要,100G就顶天了,通常80G就够了,而我是60G,这是因为我有一个小技巧,先卖个关子,后面再说。有点经验的朋友也许会说,用DiskGenius(国货之光)、Acronis,是的没错,完全可以,如果你想用这类软件我也很认同,其他的软件就不要考虑了。而我的理念就是能不装软件,就不装软件,所以我们去看看怎么给全新的硬盘去分区吧。

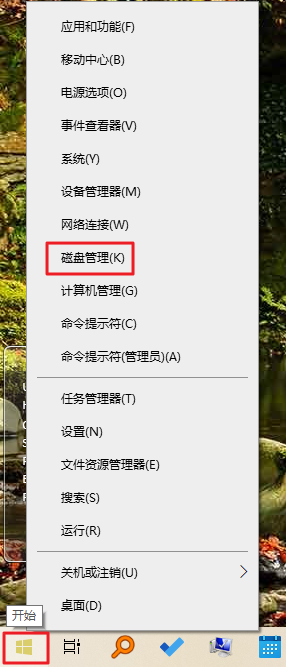
    首先用鼠标右键单击开始按钮,然后单击磁盘管理

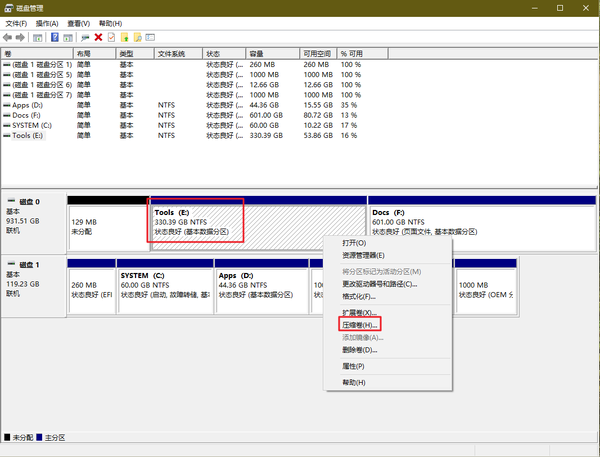
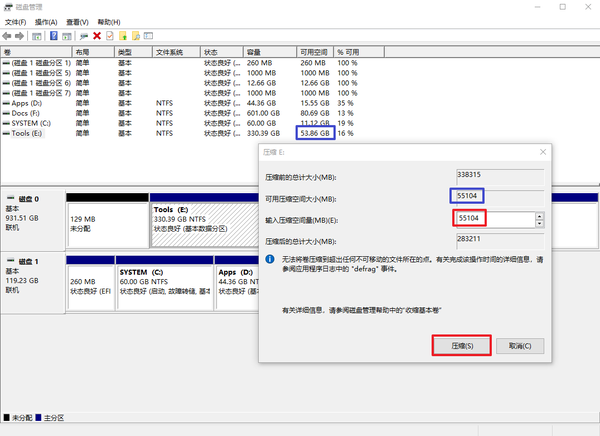
    然后就会打开Windows自带的磁盘管理,如下图,要注意,我的电脑有两块硬盘(一块机械硬盘,一块SSD硬盘),所以您能看到有磁盘0和磁盘1的存在,如果看到不一样不要惊慌,找到你要调整的盘符就行了,清晰可见,我就不圈出来了。继续操作,用鼠标右键单击您想调整的分区,然后在菜单中选择压缩卷

    接下来就是调整该分区的大小了,弹出的压缩对话框直接默认就自动填写了能够供您辗转腾挪的最大空间,即蓝色框内对应的数值,数值不一样,那是因为单位不一样,上面的是GB,下面的是MB;上面的红色框才是我们的重点,在这里输入您想要调整的空间大小即可。假如我们现在调整的是C盘,想要给C盘100GB的空间,那这里就要用:压缩前的总计大小数值 减去 102400,就是上面的红框内所需要输入的数值。最后点一下压缩按钮,很快就完成了。这里的操作都是没有啥危险的,如果您输入的数值不符合实情,会直接报错,再进行修改即可。如果您改主意了,需要再调整一下,没关系,尽管改就行了。

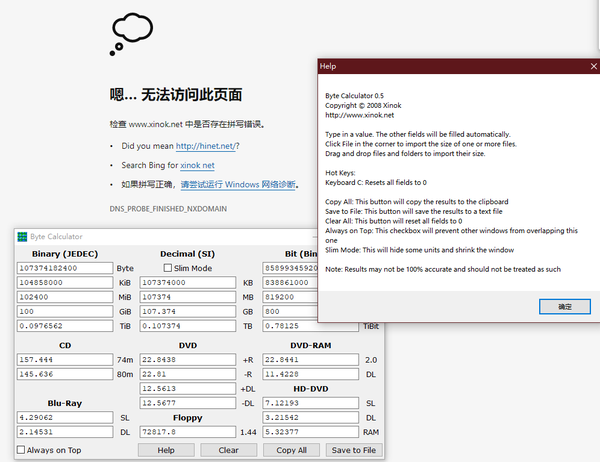
    这里安利一个绿色版小软件,专门用于换算不同单位的字节、比特等等的工具,名字叫Btye Calculator,上面的数值计算我就是用它完成的。别自己去百度瞎找,这里提供官网链接,保证绝对安全:(好意外。。。官网已经不能访问了。。。算了,如果想要这个软件私信给我邮箱,我发给您)

    插个队。。。

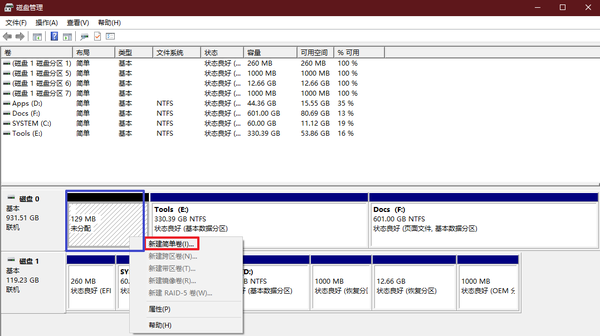
    改完之后在您的C盘分区后面就会多出一个类似于如下状态的顶部是黑色的未分配区域,这块就简单了,继续单击鼠标右键,然后单击新建简单卷,一个崭新的D盘就出来啦。

    修改盘符名称

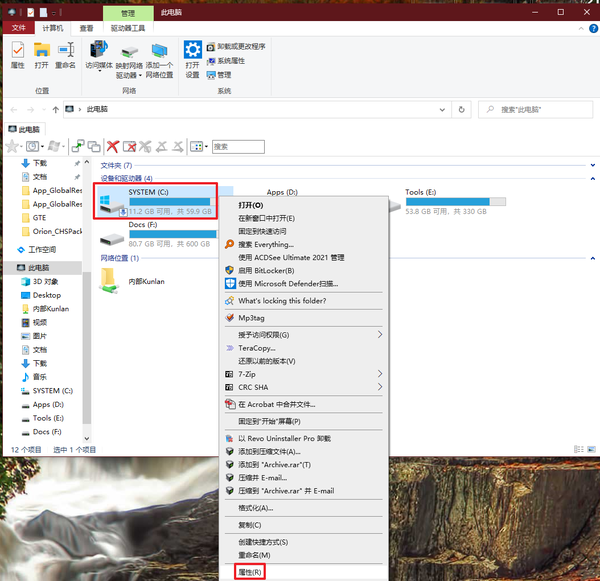
    为了让您的电脑井然有序,可以通过修改盘符名称来实现,这样就知道哪个盘放什么文件了,这个很简单,打开此电脑,右键单击该盘符,再单击属性

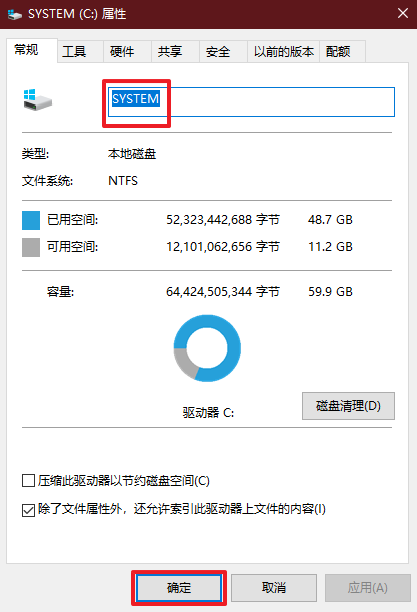
    修改红框内的文字,然后单击确定即可。

    修改默认路径

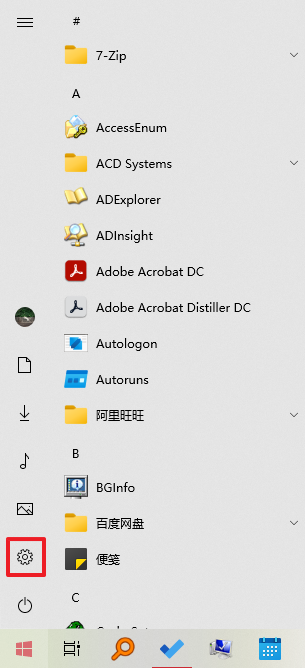
    C盘就是用来放系统相关数据的,这是Windows祖上传下来的东西,尽管现在微软也在向MacOS靠拢(看看Windows 11的开始菜单挪哪里去了;窗口的直角哪里去了),但良好的分区将会为您未来的一切意外事故留下宝贵的可选项。所以,与系统无关的个人资料的路径统统挪出C盘吧!当然,软件也可以搞定,还是那句话,系统内置功能能做的事情,绝不装软件。打开开始菜单,单击齿轮图标,进入Windows设置。

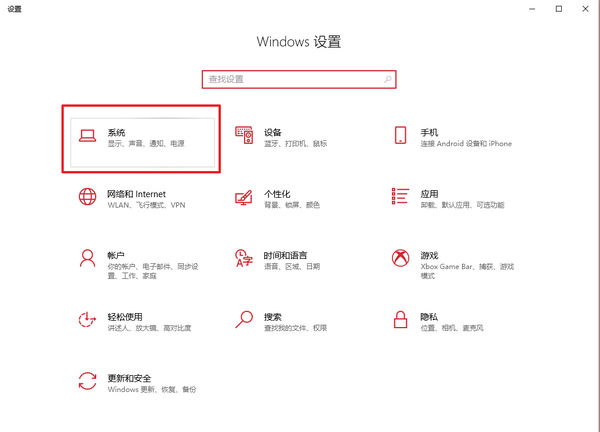
    单击系统

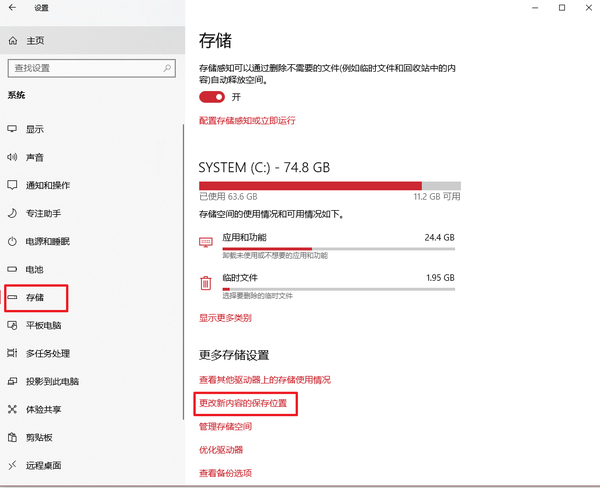
    依次单击存储 更改新内容的保存位置

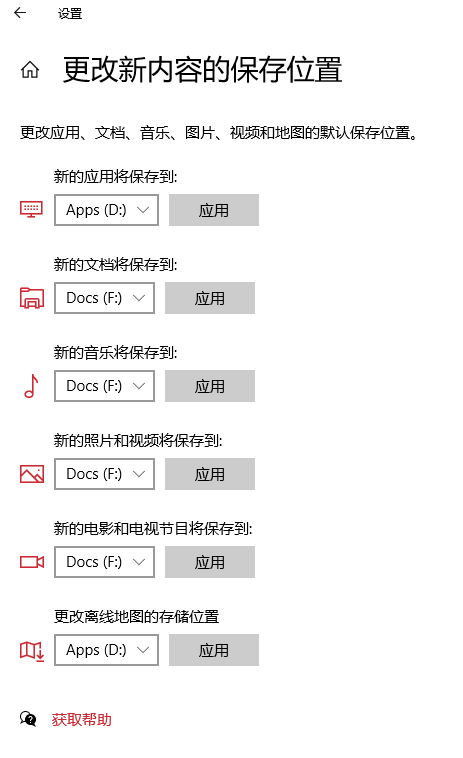
    这里就不用多说了,单击下拉菜单,根据自己所划分的分区去指定保存位置即可。最后每一个应用按钮都要点一下哦。

    接下来调整设置里没有的路径,这里轮到CMD(命令提示符,一定要以管理员身份运行)上场了,等您安装完常用软件之后再来使用这个功能,用到的命令是:

    mklink /D "原路径A" "实际路径B"

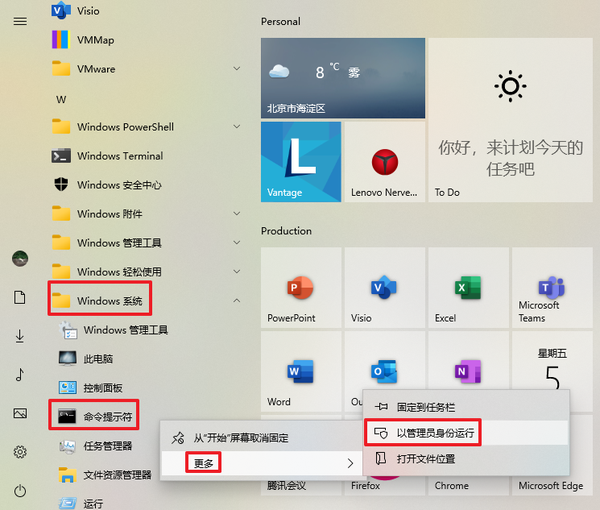
    注意参数D是大写,路径如果有空格则需要英文双引号括起来,如果没有空格可以不加双引号。这个命令是用于创建符号链接的(类似于Linux/Unix中的ln命令,也称作软链接)。你可以这么理解,虽然路径还是在C盘,但是已经名存实亡,数据其实都存放在其他的路径下了,这样就可以节约大量的C盘空间了。大致的步骤是,先把“原路径A”这个所在的文件夹剪切,然后粘贴到“实际路径B”中,一定要确保“原路径A”不存在才可以创建这个符号链接。然后,在依次单击:开始按钮Windows 系统 – 右键单击命令提示符更多以管理员身份运行

    系统类:这里需要说明的是Installer文件夹,如果把它挪出去了将是一个(在安装MSI的软件的时候会报错,解决方法就是去Windows目录把Installer的符号链接删除到回收站里,新建一个真实的Installer文件夹,等安装完之后再把Installer里新的东西剪切复制到之前的真实路径中,然后还原回收站里的Installer符号链接),但挪出去之后可以获得很可观的空间,具体的取舍就看各位自己选择了。

    mklink /D "C:\Windows\Installer" "F:\My Documents\All Temp\Installer"
    mklink /D "C:\Program Files (x86)\Microsoft" "F:\My Documents\All Temp\Program Files\Microsoft"
    mklink /D "C:\Users\Jin\AppData\Local\Microsoft\Terminal Server Client\Cache" "F:\My Documents\All Temp\Cache"
    mklink /D "C:\Users\Jin\AppData\Local\Microsoft\Terminal Server Client" "F:\My Documents\All Temp\Terminal Server Client"
    mklink /D "C:\Users\Jin\AppData\Local\Microsoft\Edge" "F:\My Documents\All Temp\Edge"

    软件类:软件类的是我的一些常用软件,如果您也安装了跟我一样的软件,直接白嫖吧,复制粘贴运行即可。

    mklink /D "C:\Users\Jin\AppData\Roaming\Microsoft\Teams\Service Worker\CacheStorage" "F:\My Documents\All Temp\Teams\Service Worker\CacheStorage"
    mklink /D C:\ProgramData\Adobe\CameraRaw "F:\My Documents\All Temp\Adobe\CameraRaw"
    mklink /D "C:\Users\Jin\AppData\Local\Tencent\WeMeet" "F:\My Documents\All Temp\WeMeet"
    mklink /D "C:\Program Files (x86)\Adobe\Acrobat DC\Setup Files" "F:\My Documents\All Temp\Acrobat\Setup Files"
    mklink /D "C:\Users\Jin\AppData\Local\Yodao" "F:\My Documents\All Temp\Yodao"
    mklink /D "C:\Users\Jin\AppData\Local\Opera Software" "F:\My Documents\All Temp\AppData\Local\Opera Software"
    mklink /D "C:\Users\Jin\AppData\Roaming\Opera Software" "F:\My Documents\All Temp\AppData\Roaming\Opera Software"
    mklink /D "C:\Users\Jin\AppData\Local\Microsoft\Outlook" "F:\My Documents\Outlook"
    mklink /D "C:\Users\Jin\AppData\Local\ACD Systems" "F:\My Documents\All Temp\ACD Systems"
    mklink /D "C:\Program Files\NVIDIA Corporation\Installer2" "F:\My Documents\All Temp\NVIDIA\Installer2"
    mklink /D "C:\ProgramData\NVIDIA Corporation\Downloader" "F:\My Documents\All Temp\NVIDIA\Downloader"
    mklink /D "C:\ProgramData\NVIDIA Corporation\NV_Cache" "F:\My Documents\All Temp\NVIDIA\NV_Cache"
    mklink /D "C:\ProgramData\NVIDIA Corporation\NVIDIA GeForce Experience\Logs" "F:\My Documents\All Temp\NVIDIA\Logs"
    mklink /D "C:\Program Files (x86)\Google" "F:\My Documents\All Temp\Google Home\Google"
    mklink /D "D:\Program Files\Foxmail 7.0\Data" "F:\My Documents\All Temp\Foxmail\Data"
    mklink /D "c:\users\Jin\appdata\roaming\Bing Best" "f:\My documents\All temp\Bing Best"
    mklink /D "c:\users\Jin\appdata\roaming\foobar2000" "f:\My documents\All temp\foobar2000"
    mklink /D "C:\Program Files (x86)\Common Files\VMware\InstallerCache" "F:\My Documents\All Temp\VMware\InstallerCache"
    mklink /D "C:\Users\Jin\AppData\Local\Steam" "F:\My Documents\All Temp\Steam"
    mklink /D "C:\Users\Jin\AppData\Roaming\Mozilla" "F:\My Documents\All Temp\Roaming\Mozilla"
    mklink /D "C:\Users\Jin\AppData\Roaming\Tencent" "F:\My Documents\All Temp\Tencent"
    mklink /D "C:\Users\Jin\AppData\Roaming\Foxmail7" "F:\My Documents\All Temp\Foxmail7"
    mklink /D "C:\Users\Jin\AppData\Roaming\Bitcoin" "F:\My Documents\All Temp\Bitcoin"
    mklink /D "C:\Users\Jin\AppData\Roaming\ProtoShares" "F:\My Documents\All Temp\ProtoShares"
    mklink /D D:\MSOCache "F:\My Documents\All Temp\MSOCache"
    mklink /D "C:\Users\Jin\AppData\Local\Google" "F:\My Documents\All Temp\Google"
    mklink /D "C:\Users\Jin\AppData\Local\Mozilla" "F:\My Documents\All Temp\Local\Mozilla"

    我的电脑(此电脑)

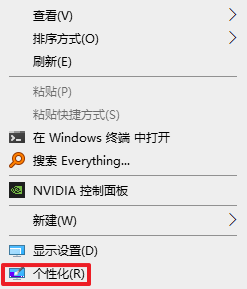
    用惯了Windows的朋友一定早就习惯了桌面上我的电脑的存在,Windows 10里改名了,叫此电脑,默认可没有放在桌面上,怎么把它高雅的调出来呢?往下看。在桌面任意位置右键单击,单击个性化

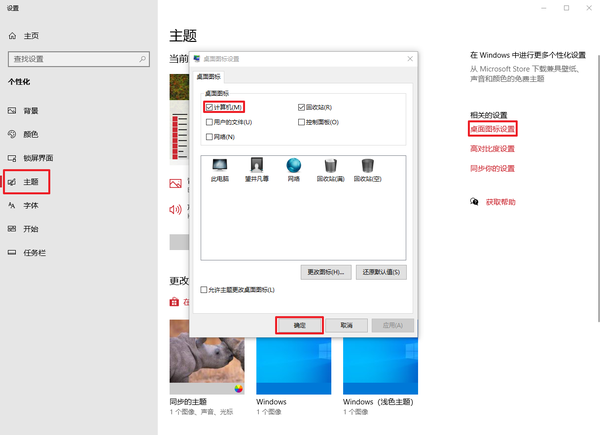
    然后依次单击主题桌面图标设置计算机确定,搞定!

    以上工作完成之后,接下来我们就可以开始安装常用软件了,哪些软件该安装,哪些不该安装,咱们下一篇-软件篇再见!

  • How to configure the SNMP protocol of AIX

    How to configure the SNMP protocol of AIX

    1, Configuring the SNMP Agent in the AIX

    1×1 Check the current running SNMP version

    ls -l /usr/sbin/snmpd*
    AIX SNMP

    You can see that the current snmpd is using snmpdv3ne, which means that it supports the non-encrypted version of SNMPv3, ne=no encryption, as long as /etc/snmpdv3.conf is configured, it can be used in the way of SNMPv1, so the default version can meet the requirements, if there are special needs, you can also change the version with snmpv3_ssw command.

    Switch to SNMPv1

    snmpv3_ssw -1

    Switching to SNMPv3 non-encrypted version

    snmpv3_ssw -n

    Switch to the encrypted version of SNMPv3 (this version is not installed by default)

    snmpv3_ssw -e

    1×2 Create a community called hmsnmp

    Modify the /etc/snmpdv3.conf file as shown below, taking special care to mark the sections with red lines.

    Where 192.0.243.113 is the IP address of the monitoring tool, indicating that only this IP is allowed to access SNMP of AIX, for security reasons.

    1×3 Stop and start the service to make changes to /etc/snmpdv3.conf effective

    stopsrc -s aixmibd
    stopsrc -s snmpmibd
    stopsrc -s hostmibd
    stopsrc -s snmpd
    startsrc -s snmpd
    startsrc -s hostmibd -a "-c hmsnmp"
    startsrc -s snmpmibd -a "-c hmsnmp"
    startsrc -s aixmibd -a "-c hmsnmp"

    It is important to note that when the operating system reboots, the default boot parameters are public community, so in order to make the hmsnmp community work properly after the reboot, it is recommended to modify the /etc/rc.tcpip file to modify the default boot parameters as follows.

    Start up the hostmibd daemon

    start /usr/sbin/hostmibd "$src_running" "-c hmsnmp "

    Start up the snmpmibd daemon

    start /usr/sbin/snmpmibd "$src_running" "-c hmsnmp "

    Start up the aixmibd daemon

    start /usr/sbin/aixmibd "$src_running" "-c hmsnmp "

    1×4 testing for normal SNMP service

    Execute the following commands locally:

    # snmpinfo -md -c hmsnmp sysDescr
    
    1.3.6.1.2.1.1.1.0 = "IBM PowerPC CHRP Computer
    Machine Type: 0x0800004c Processor id: 00F7TEST4C00
    Base Operating System Runtime AIX version: 06.01.0007.0015
    TCP/IP Client Support version: 06.01.0007.0016"

    On other machines where SNMPWALK is installed the following commands can be executed for verification.

    # snmpwalk -v 1 -c hmsnmp 192.0.246.23 1.3.6.1.2.1.1.1.0
    
    SNMPv2-MIB::sysDescr.0 = STRING: IBM PowerPC CHRP Computer
    Machine Type: 0x0800004c Processor id: 00F7TEST4C00
    Base Operating System Runtime AIX version: 06.01.0007.0015
    TCP/IP Client Support version: 06.01.0007.0016

    2, MIB OID commonly used in AIX
    Above, we configured the value of SNMP Community: hmsnmp, which can be used to monitor SNMP-related services of the tool.
    If you need to find the OID of an object, you can go to /etc/mib.defs to find the corresponding object, and then snmpinfo -md ObjectName to get the corresponding OID for remote call.

    2×1 Display CPU usage

    # snmpinfo -md -v -c hmsnmp aixSeCPUUtilization
    
    aixSeCPUUtilization.0 = 5

    Remove the -v parameter and you see the OID value.

    # snmpinfo -md -c hmsnmp aixSeCPUUtilization
    
    1.3.6.1.4.1.2.6.191.1.2.1.0 = 5

    2×2 Show Paging Space

    # snmpinfo -md -v -c hmsnmp aixPagingSpace
    
    aixPageThreshold.0 = 95
    aixPageName.1 = "hd6"
    aixPageNameVG.1 = "rootvg"
    aixPageNamePV.1 = "hdisk0"
    aixPageSize.1 = 14336
    aixPagePercentUsed.1 = 1
    aixPageStatus.1 = 1
    aixPageType.1 = 1
    aixPageIndex.1 = 1

    2×3 View the serial number of the machine

    # snmpinfo -md -v -c hmsnmp aixSeMachineType
    
    aixSeMachineType.0 = "IBM,8205-E6C"
    
    # snmpinfo -md -v -c hmsnmp aixSeSerialNumber
    
    aixSeSerialNumber.0 = "IBM,0210TESTR"

    2×4 View CPU count

    # snmpinfo -md -v -c hmsnmp aixSeNumCPUs
    
    aixSeNumCPUs.0 = 4

    2×5 View VG-related information: aixVolumeGroup

    2×6 View LV-related information: aixLogicalVolume

    2×7 View PV-related information: aixPhysicalVolume

    2×8 View FS-related information: aixFileSystem

    3, A simple case of system monitoring via SNMP

    If you are just doing a simple monitoring, then you can write your own shell script.

    Let’s write a shell script, AIX_FS_CHECK.sh, which is deployed on the monitor, using the usage of the monitor file system as an example.

    In order to see the actual output, we set the threshold to a low value in the script, if you are interested, you can also bring the threshold as a parameter in the script.

    # . /AIX_FS_CHECK.sh -h 192.0.246.23 -c hmsnmp
    
    WARNING!!! /usr used 74%
    WARNING!!! /usr Inodes used 18%
    WARNING!!! /patch used 97%

    The monitor smoothly gets the information of the monitored device through SNMP and sends the relevant alarm information according to our request.

    4, Summary

    This article introduces the method of monitoring AIX system using SNMP protocol. Although there is still a long way to realize the monitoring of various indicators, flexibility and ease of use should be improved, but it provides a way of thinking to realize the monitoring of the operating system in an agentless way, I hope to bring some help to those who need it.

    5, Additional

    Alternatively, there is another way to use the conf file I provided directly, which of course requires you to modify the community and IP address.

    5×1 Stop service.

    stopsrc -s snmpd

    5×2 Modify the conf file, replace the original conf file, and remember to back it up before replacing it.

    5×3 Start service.

    startsrc -s snmpd

    snmpd.conf content:

    ###############################################################################
    #
    # EXAMPLE.conf:
    #   An example configuration file for configuring the Net-SNMP agent ('snmpd')
    #   See the 'snmpd.conf(5)' man page for details
    #
    #  Some entries are deliberately commented out, and will need to be explicitly activated
    #
    ###############################################################################
    #
    #  AGENT BEHAVIOUR
    #
    
    #  Listen for connections from the local system only
    #agentAddress  udp:127.0.0.1:161
    #  Listen for connections on all interfaces (both IPv4 *and* IPv6)
    agentAddress udp:161,udp6:[::1]:161


    ###############################################################################
    #
    #  SNMPv3 AUTHENTICATION
    #
    #  Note that these particular settings don't actually belong here.
    #  They should be copied to the file /var/net-snmp/snmpd.conf
    #     and the passwords changed, before being uncommented in that file *only*.
    #  Then restart the agent
    
    #  createUser authOnlyUser  MD5 "remember to change this password"
    #  createUser authPrivUser  SHA "remember to change this one too"  DES
    #  createUser internalUser  MD5 "this is only ever used internally, but still change the password"
    
    #  If you also change the usernames (which might be sensible),
    #  then remember to update the other occurances in this example config file to match.


    ###############################################################################
                                                     #     Remember to activate the 'createUser' lines above
    #  ACCESS CONTROL
    #
    
                                                     #  Default access to basic system info
    view systemonly internet                    - included -
    view systemonly 1.3.6.1.4.1.2               - included -
    view systemonly 1.3.6.1.4.1.2.2             - included -
    view systemonly 1.3.6.1.4.1.2.3             - included -
    view systemonly 1.3.6.1.4.1.2.5             - included -
    view systemonly 1.3.6.1.4.1.2.6             - included -
    view systemonly directory                   - included -
    view systemonly mgmt                        - included -
    view systemonly mib-2                       - included -
    view systemonly system                      - included -
    view systemonly aix                         - included -
    view systemonly 1.3.6.1.4                   - included -
    view systemonly 1.3.6.1.6                   - included -
    view systemonly 1.3.6.1.6.3.1.1.5           - included -
    view systemonly 1.3.6.1.4.1.2021            - included -
    view systemonly 1.3.6.1.4.1.2.3.1.2.2.2.1.4 - included -
    
    # Include aixmibd managed MIBS with this view
    view systemonly 1.3.6.1.4.1.2.6.191         - included -
    
    #view   systemonly  included   .1.3.6
    #view   systemonly  included   .1.3.6.1.4.1.2021.10.1.3.1
    #view   systemonly  included   .1.3.6.1.4.1.2021.11.9.0
    #view   systemonly  included   .1.3.6.1.4.1.2021.11.11.0
    #view   systemonly  included   .1.3.6.1.4.1.2021.9
    #view   systemonly  included   .1.3.6.1.2.3.1.2.1.2
    #view   systemonly  included   .1.3.6.1.4.1.2.3.1.2.2.1.1.2
    #view   systemonly  included   .1.3.6.1.2.1.1
    #view   systemonly  included   .1.3.6.1.2.1.25.1
    
                                                     #  Full access from the local host
    #rocommunity public  localhost
                                                     #  Default access to basic system info
    # rocommunity public  default    -V systemonly
    rocommunity public
    
                                                     #  Full access from an example network
                                                     #     Adjust this network address to match your local
                                                     #     settings, change the community string,
                                                     #     and check the 'agentAddress' setting above
    #rocommunity secret  10.0.0.0/16
    
                                                     #  Full read-only access for SNMPv3
     rouser   authOnlyUser
                                                     #  Full write access for encrypted requests
                                                     #     Remember to activate the 'createUser' lines above
    #rwuser   authPrivUser   priv
    
    #  It's no longer typically necessary to use the full 'com2sec/group/access' configuration
    #  r[ou]user and r[ow]community, together with suitable views, should cover most requirements


    ###############################################################################
    #
    #  SYSTEM INFORMATION
    #
    
    #  Note that setting these values here, results in the corresponding MIB objects being 'read-only'
    #  See snmpd.conf(5) for more details
    sysLocation    Sitting on the Dock of the Bay
    sysContact     Me <me@example.org>
                                                     # Application + End-to-End layers
    sysServices    72
    
    
    #
    #  Process Monitoring
    #
                                   # At least one  'mountd' process
    proc  mountd
                                   # No more than 4 'ntalkd' processes - 0 is OK
    proc  ntalkd    4
                                   # At least one 'sendmail' process, but no more than 10
    proc  sendmail 10 1
    
    #  Walk the UCD-SNMP-MIB::prTable to see the resulting output
    #  Note that this table will be empty if there are no "proc" entries in the snmpd.conf file
    
    
    #
    #  Disk Monitoring
    #
                                   # 10MBs required on root disk, 5% free on /var, 10% free on all other disks
    disk       /     10000
    disk       /var  5%
    disk       /usr  10000
    includeAllDisks  10%
    
    #  Walk the UCD-SNMP-MIB::dskTable to see the resulting output
    #  Note that this table will be empty if there are no "disk" entries in the snmpd.conf file
    
    
    #
    #  System Load
    #
                                   # Unacceptable 1-, 5-, and 15-minute load averages
    load   12 10 5
    
    #  Walk the UCD-SNMP-MIB::laTable to see the resulting output
    #  Note that this table *will* be populated, even without a "load" entry in the snmpd.conf file


    ###############################################################################
    #
    #  ACTIVE MONITORING
    #
    
                                        #   send SNMPv1  traps
     trapsink     localhost public
                                        #   send SNMPv2c traps
    #trap2sink    localhost public
                                        #   send SNMPv2c INFORMs
    #informsink   localhost public
    
    #  Note that you typically only want *one* of these three lines
    #  Uncommenting two (or all three) will result in multiple copies of each notification.
    
    
    #
    #  Event MIB - automatically generate alerts
    #
                                       # Remember to activate the 'createUser' lines above
    iquerySecName   internalUser       
    rouser          internalUser
                                       # generate traps on UCD error conditions
    defaultMonitors          yes
                                       # generate traps on linkUp/Down
    linkUpDownNotifications  yes


    ###############################################################################
    #
    #  EXTENDING THE AGENT
    #
    
    #
    #  Arbitrary extension commands
    #
     extend    test1   /bin/echo  Hello, world!
     extend-sh test2   echo Hello, world! ; echo Hi there ; exit 35
    #extend-sh test3   /bin/sh /tmp/shtest
    
    #  Note that this last entry requires the script '/tmp/shtest' to be created first,
    #    containing the same three shell commands, before the line is uncommented
    
    #  Walk the NET-SNMP-EXTEND-MIB tables (nsExtendConfigTable, nsExtendOutput1Table
    #     and nsExtendOutput2Table) to see the resulting output
    
    #  Note that the "extend" directive supercedes the previous "exec" and "sh" directives
    #  However, walking the UCD-SNMP-MIB::extTable should still returns the same output,
    #     as well as the fuller results in the above tables.
    
    
    #
    #  "Pass-through" MIB extension command
    #
    #pass .1.3.6.1.4.1.8072.2.255  /bin/sh       PREFIX/local/passtest
    #pass .1.3.6.1.4.1.8072.2.255  /usr/bin/perl PREFIX/local/passtest.pl
    
    # Note that this requires one of the two 'passtest' scripts to be installed first,
    #    before the appropriate line is uncommented.
    # These scripts can be found in the 'local' directory of the source distribution,
    #     and are not installed automatically.
    
    #  Walk the NET-SNMP-PASS-MIB::netSnmpPassExamples subtree to see the resulting output
    
    
    #
    #  AgentX Sub-agents
    #
                                               #  Run as an AgentX master agent
     master          agentx
                                               #  Listen for network connections (from localhost)
                                               #    rather than the default named socket /var/agentx/master
    #agentXSocket    tcp:localhost:705
    
    #proxy -v 1 -c public 127.0.0.1:1610 .1.3.6.1.4.1.2021.9